Tuesday, December 11, 2012

Twin Tuesday V

My Twin Baby Shower


This will be the last blog before I have my twins (tomorrow!!!!).  It's been quite an adventure and I'm amazed (as are the doctors and nurses) that I've made it to 38 weeks!  Now I'm (ironically) scheduled for an induction on 12-12-12.  After all the contractions, preterm labor, and trips to the hospital the boys are deciding to stay in a little longer on their own. Oh my, are they going to be trouble when they arrive!

Before I hit preterm labor and bedrest (the Saturday before), two amazing friends and my mom threw me my twin baby shower.  I pinned a ton of ideas on pinterest beforehand and they took a peek to get ideas there.

Upon arrival, my friends self addressed envelopes for my Thank You notes I'd send just a few days after the shower.  (Thank you for doing this!  Saved me lots of time!)  Then they headed to the main room where they deposited baby pictures of themselves for a game we'd be playing once everyone arrived.

We chatted over delicious refreshments and when all had arrived we played the Baby Guess Who Game.  The winner got a prize (Double Mint Gum or another wonderful gift provided by my wonderful hostesses!).

After that we played Twin Jeopardy.  My friend, Sarah, did a wonderful job with this game.  There were 4 fun categories: Food Pairs, Famous Twins, Little Known Facts, and Our Twins.  We used some of the fun facts from my first Twin Tuesday post.  This game was a huge hit!  Way fun!  We all ended up tying, but you could have prizes for the team that wins.

More refreshements while I opened way too cute gifts.  We asked everyone to bring a pack of diapers and/or a freezer meal.  This is a big help!  Of course, we loved getting cute matching/coordinating outfits and blankets as well!  Some generous friends/family members gave us gift cards to our favorite restaurants as well.


Our last activity was decorating monthly onsies for the boys.  Two pairs for each month.  Some match some don't, but we used coordinating fabric (left over from their nursery fabric...bumpers and drapes).  My plan is to take pictures of them in their onsies every month.  These turned out super cute!  And were pretty easy to make! (For each set you need: 3x 0-3 month onsies, 3x 3-6 months, 6x6-12 month onsies...that's how they came packaged...two-sided iron on adhesive, fabric, stencils or printouts, irons, and ironing boards) We had some cutting out circles and numbers out of the fabric and adhesive (some was pre-cut), some girlfriends ironed on the numbers to the circles, some ironed on the numbered circles to the onsies, others repackaged them for me into ziplock bags.  This activity took the longest...it may be a good one to start with while you wait for others to arrive at the beginning.

Altogether, the shower was a blast!  I'm so grateful to have such wonderful friends and a great mom who helped with the decorating.

Other activities I'd suggest if you're short on ideas:

Photo booth
4 other fabulous ideas!  *my favorite is the late night diaper notes

Thursday, December 6, 2012

Christmas Traditions

Everyone love traditions, right?  And Christmas time seems to be the one holiday full of them.  Feel free to comment some awesome traditions your family does each year.  Here are some of ours:


1.  Every year my mom makes a Christmas ornament that symbolizes what the most important event was that year (baby's birth, moving, a family vacation...).  She's done this since I was 3.  She made ten to a dozen of the ornaments so that when each child got married they took 2 of each set with them (it was her bridal shower gift to me, and I loved it!  She even typed up a description of each ornament and what meaning was behind it).  She still makes ornaments every year, so I chose to make ornaments for my family to hand down to my kids of really big events in our lives.  I made one set the first year we were married, when each of our kids were born, and when we bought our first house.  This way your kiddos won't have a bare tree their first Christmas on their own.

2.  Advent Calendar or Leighs.  Wish I had a picture.  Each day my kiddos (and my husband and I) get a piece of candy and a piece of paper with a Christmas activity listed on it to accomplish that day(wear jingle bells on your shoelaces, call your Grandma and sing a Christmas song, Ding dong ditch a plate of goodies...).

3. We give one gift to each of us Christmas Eve.  It's usually the classic pajamas.  But I've added a new children's book for each of our kiddos to go with the PJs.  We read each one before they go to bed Christmas Eve.

4.  Read stories of Jesus each night of December.  We try to stay focused on the reason for the season.  Especially now that our kids are getting older.

5. Build a snowman and/or go sledding if there's snow.  The first day it snows for the winter season we buy powdered donuts and have them for dessert that night.  Then the next day we try to go play in the snow as a family.

6.  We give eachother only 3 gifts Christmas day.  The wisemen brought Jesus 3 gifts and as a reminder each of us only get 3 gifts.

7.  Christmas Eve we drive around to look at the lights with hot cocoa while we listen to Christmas music.  (We give the kiddos sturdy sippy cups while in the car)

8.  We make treats and take them to our friends and neighbors.  Sometimes we ding dong ditch them with a note like: From your neighbors or From members of your church.  This way they know it's safe to eat.

9.  We set a rule the first Christmas we had a child that we would just spend the time as our little family.  This is a hard one, but it allows us to really spend time with our kids and enjoy the day without having to drive lots.  We make sure we celebrate Christmas with our extended family on the day after or the weekend before Christmas though.

10.  One of my favorite traditions is a romantic candle light dinner with my husband after the kids go to bed Christmas Eve.  We feed the kids a Christmas tree pizza (homemade of course, cuz where would you find Christmas tree shaped pizza dough) and we save our appetite for after they go to bed.  We listen to some Bing Crosby Christmas music, light some candles, and have crablegs and lobster (our one night of the year we really splurge on a dinner for just us).  We crack open a bottle of Sparkling Cider and toast to a wonderful year and to eachother and to our beautiful children who are dreaming about tomorrow. 

We have more traditions, but these are our unique ones or my favorites.  I would love to hear what your family does each year!!!  Merry Christmas!

Tuesday, December 4, 2012

Twin Tuesday IV

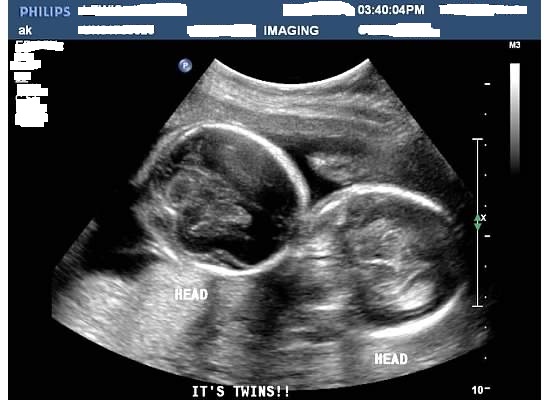
I posted my last Twin Tuesday yesterday (not a Tuesday, I know.  But, there was reasoning behind it).  The reason being;  Preterm Labor and Bedrest.  So this Twin Tuesday will be an Ode to Preterm Labor and Bedrest.  (Don't worry I won't break out into song or write a corney poem)

Preterm Labor started for me around 33 weeks.  Having twins, this is pretty normal even though my whole pregnancy was deemed healthy over all and the doctor did not foresee this as an issue.  Here's what happened.  I went into my regular weekly doctor visit (that's right, weekly...with twins and multiples you can expect to see your doc much more) and after getting checked, I was dilated to a 1 and 70% effaced (no I'm not going to explain what that means, I'm bashful).  Then the doctor wanted to do a NST (Non-stress test...where they hook you up to monitors to check on your babies and your contractions...pretty standard, nothing to worry about if you ever have one.  They're painless, just make sure you're in a comfy position because you'll be there for typically 20 minutes).  My contractions were coming every 2-3 minutes and taking my breath away every other contraction.  (Fact I didn't know, at the beginning you usually only feel every other contraction...who knew right?)

So, off to the hospital I went to try on a fashionable gown (not!) and get hooked up to an IV, monitors, and prepare myself for a load of meds to stop the contractions.  First, blood draw.  Second, a steroid shot to help the babies lungs develop (this is called antenatal corticosteroids and is a shot that goes right in your tooshy.  This shot is given in 2 doses, one 24 hours after the first and can be given when the gestational age is from 24 to 34 weeks).  Third, a shot called Terbutaline (this shot is given in the arm and stings...luckily my nurse put a local anethestic with it to help soothe the sting.  It's use for preterm labor is an unlabeled use of the medicine, but it helps relax the uterus and can help delay preterm labor for 24 to 48 hours, allowing the steroid shot to be administered for the babies lungs.  It makes you feel super jittery though.  My heart beat rapidly and I felt like it would jump out of my chest.  My legs and body also shook, like when you're really nervous.)  Fourth, I was given a pill to take every 3-6 hours called Nifedipine (This is a calcium blocker, it blocks calcium to the uterus which allows the uterus to relax because the uterus needs calcium to contract.  The biggest side effect of this pill was a splitting headache, but it goes away in time). Fifth, lots of fluids (in IV and orally) and no solid foods (pregnant lady of twins starving to death!  I love my food and have to eat every 3-4 hours.  Making two babies requires a lot of calories, okay?).  After all that (which occurs within a half hour or so) it's 24 hours of monitoring and going to the bathroom every 2 hours.  Seriously, all that fluid and such a tiny bladder?  Yowza!

Luckily, the contractions slowed (but haven't gone away) and I didn't have any cervical change.  I went home on bedrest.  Oh, bedrest.  What mom wouldn't want to take a break and have to lay around all day, right?  Err, WRONG.  This mama is an active one and after 2 days, trust me, you get tired of laying around all the time.  It's been 4 weeks now.  Here's what you need to know about bedrest:

1.) Have a plan!  If you anticipate bedrest at all (if you're carrying multiples, this is you), then make a list of activities or chores that you can do on bedrest.  (Example: Make an online baby book for your other kiddos or make a yearbook..shutterfly is awesome for this.  Organize photos.  Make a cd for labor when the time does come with relaxing tunes.  Write letters to your grandparents.  Blog.  Read a few books.  Have friends visit.  Watch a flick with your hubby while he rubs your back.  Learn how to knit.  Make some handmade presents or address and write birthday cards.  The ideas are endless.)

2.) Keep a journal and/or a check off list.  It will be good to one day look back at this time and see how awful it really is to have to lay around all day...especially, when we want a break and say, "gosh, it would be nice to be able to just stay in bed all day".  It's also important to feel like you're still accomplishing daily tasks.  If you're like me you like check lists.  (Paid bills: check.  Balanced checkbook: check.  Emailed: check.  Blogged: check.  Called my neighbor: check.  You get the idea.)  It helps to keep track of your days too.  Trust me, a month can go by unnoticed unless you keep some sort of record.

3.)  Accept and ask for help.  Let's face it.  You can't be on bedrest without help.  Whether you have older kids or not, someone's going to have to help with the cooking and the cleaning.  Believe it or not, your hubby can't do it all.  You are superwoman, remember?  Your husband is already busy with work and doesn't want to come home every day to take care of the stuff you normally do...sure he can do some things but he's going to get burnt out fast if he tries to do it all.  No one can replace you.  But many people can cover the things you do normally.  If you have older kids, like me, your doctor may tell you something you may feel as harsh (but it's true), "You can not be your children's primary caregiver right now."  So, grandparents, sisters, brothers, neighbors, church friends will step up and help.  You have to ask though.  This was hard for me.  My mother-in-law helps almost daily and she spends the night througout the week to help me with my kids first thing in the morning.  She brings me my meals in bed and helps me up when I need it, all while taking care of my 2 girls.  When she needs a break, I call in the troops (my family and friends).  It's important to stock up on thank you cards and little treats to hand out or mail...this is another thing you can do while laying there. 

4.)  Meal plan.  Even if you have a singleton start planning meals and prepping freezer meals in your second trimester.  So, if bedrest arrises OR after your baby is born you feel overwhelmed and tired (this happens to the best of us) your family won't starve.  Start stocking up on essentials in your pantry: easy snacks, pastas, cereals, canned soups, canned veggies, etc.  (Not a bad idea to stock up on other essentials too: toilet paper, shampoo, toothpaste, kleenex...you get the idea)  Accept meals or ask for someone to help by bringing your family a meal once a week.  You'd be surprised how many people are willing.  My baby shower was a few days before all this preterm labor stuff happened, I asked everyone to bring a package of diapers and a freezer meal.  Many people brought gift cards to restaurants (just as good if not better than a freezer meal!).  Feel free to ask the same at your shower.

5.)  Take time for your family.  Being locked up in your room all day can be pretty isolating.  Especially, when your kids and hubby spend most of their time in the living and dining room.  Make sure that you explain to them that you want time with them too.  Play a game of Candy Land on your bed with the family, put a puzzle together, watch a movie and snack on popcorn, talk together, read a book together.  Chances are your family members miss you too.

6.) Exercise and take care of your body.  Do leg and foot exercises to help prevent blood clots and to help your body in general.  Ask your doctor for a list of acceptable exercises you can do.  Get a prenatal massage.  Chances are there's someone in your area that makes house calls for prenatal massage.  Once you have the okay from the doc, give your massage therapist a call.  You won't regret it.

7.) Rest when you need it, but try to save majority of your sleep for night time.  Insomnia is easy to obtain when you are pregnant.  Aching muscles, being kicked in your ribs, having to pee lots, thinking about baby/ies all the time...yep, that would keep just about anybody awake.  But the best thing you can do is maintain a regular sleep cycle.  Nap during the day, let's be honest you may not get the chance to when babies arrive.  But make sure you keep on track with sleeping mostly at night. 

8.) Keep tabs on your emotions.  It's easy to get depressed or feel really down on bedrest.  Isolation.  Feeling helpless.  Having control over nothing.  We all feel it.  It's normal.  Just don't let it get in the way of remembering the reason why you are on bedrest.  You are protecting your babies and giving them the best chance they have to develop and have healthy bodies.  Babies born prior to 37 weeks can have a hard time breathing on their own, may not be able to nurse, may have long term problems like hearing and sight difficulties.  Taking it easy is not an easy or selfish thing.  It's giving your babies a chance to have the healthiest start possible.  If you feel really depressed, let your doctor and spouse know.  It's important to communicate your emotions.

I'm sure there's lots of other stuff to know, but I think I've said enough.  After a month of bedrest and prescriptions and being in and out of the hospital 4 times with preterm labor, I've made it to week 37 today.  My twins are officially full term.  It's been hard, but totally worth it.  Now, can somebody tell them it's okay to come out? 

Monday, December 3, 2012

Twin Tuesday III

Our Gender Reveal-  Part One:


Here's how we broke the news to our family that we were having a boy...make that two boys.  The day we found out we were pregnant with twin boys, we decided that we couldn't hold this news in very long.  So we worked it out that my side of the family would come up for dinner at a restaurant that night.  Before they arrived my husband and I drove around like crazy trying to get things together for the big surprise.
  Since we have two little girls that we would be telling at the same time, we wanted to get them something special.  So my husband and I went to Build-a-Bear.  We picked out two teddy bears and put blue shirts on them with a voice recording in each that said, "We love our baby boy".  Then we got two bundles of blue balloons.  We dropped these off at the restaurant with directions for the waitress to bring one bear and set of balloons out at dinner and the other bear and balloon set out at dessert.
  Family arrived, ordered, and out came dinner with the surprise gender reveal package #1.  My mom flipped.  She was sooooo excited. "A boy?!!!"  It's a boy, my husband and I winked at eachother.  Boy, if her reaction was that great about one boy we couldn't wait to see what it would be like about two!  My dad made it just in time to order dessert (he had to work late), when he saw the blue balloons upon walking in the restaurant he said, "All right!  We need another boy in the family".  Just as he sat down the other set of balloons and the bear was brought out.  My mom looked at me confused, "Wait, I thought we just...wait a minute!  Are you having twins?!?!?!"  YES!!!!  My mom literally screamed with excitement and got out of her seat jumping up and down (yes, in the middle of the restaurant!  And yes, I got most of it on video...would put it on youtube, but I don't want to expose my mom.  lol).  People at other tables had been watching this all unfold too, they congratulated us as well.  The staff at the restaurant were watching from around the corner and some of them had started crying.  Apparently, our surprise was a fun success for all!
  Our girls, meanwhile, a little confused by all the noise still loved their bears and hugged them all night long.  They now understand that mommy has 2 babies in her tummy, not just one and that they are going to be boys. 

Part Two:

  The next night, we got to do the reveal all over again with my husband's parents.  This time we switched things up a little.  We went to our favorite store, picked up blue receiving blankets, blue binkies, double mint gum, double stuffed oreos, twix, double packaged candybars, and a few other "twin" items.  I wrapped up the twin/double stuff in the blankets to make it look like a baby (I made two).  Then we went to the restaurant and gave one to the waiter with the instructions to bring it out during dinner. 
  Ironically, our server was a twin and watched with anticipation as my in-laws opened the baby package. "Blue blanket, I'm guessing it's a boy?" said my mother-in-law.  Yep.  Then she continued to open the bundle.  When she got to the twix bar, she asked, "Are you guys trying to tell us something?  Are there two in there?".  Yep.  Then we gave Grandpa the other bundle.  They were both tickled at the idea of twin boys.
 
It was fun to tell our family about our surprise double boy package this way.  There are lots of gender reveal ideas that I love, the cakes with the inside either pink or blue, gender colored balloons flying out of a box wrapped up with the question: Boy or Girl?, my friend from Sewing Our Life Together did a great postcard that was a scratch and reveal, with our girls we gave my parents toy blocks with the letters GIRL that they had to unscramble and I bought a onsie that said 100% girl.  Do you have any great Gender Reveal tips or ideas?  Feel free to share!

Tuesday, November 20, 2012

Twin Tuesday II

My first Twin Tuesday post was a fun fact post...now here's one that's a little more personal...

The story of our twins.  Here's how we found out:

We have two beautiful, bright, funny little girls.  This spring we got a surprise that we were pregnant again.  My response, "Really?  REally?  REALLY?!?".  A little panicked at the idea of having 3 kiddos under the age of 3. As my pregnancy progressed it turned out to be a lot harder than my first two.  I was much sicker than I had ever been with my girls, I was soooooo tired, and I was bigger faster.  My husband and I thought, "okay, must be a boy this time around".  The doctor said, "Well, it's your third pregnancy and the normal pregnancy symptoms may be increased". 

  Finally, at 20 weeks, we were scheduled for our gender reveal ultrasound.  Since my pregnancy had been relatively healthy up to this point, this was our first ultrasound.  Upon laying down and revealing my very round tummy, the tech asked if this was our first ultrasound.  Yes.  Then she put the wand to my tummy to be able to see into the world known as my belly.  I couldn't see the screen, but my husband could at the start.  I watched him as his expression became one of confusion.  He is really good at picking out what's what in an ultrasound (me, it takes a while to figure it out).  So his look caused some alarm.  Then the tech asked again, "Are you sure this is your first ultrasound".  Ummm, yes!  Who would forget an ultrasound?  "Is everything okay?  Is the baby okay?"  Then the tech threw out the news, "You know you're having twins, right?"  Shock!  "Are you kidding?"  No, she doesn't joke about that kind of stuff.  Then my dear husband said, "I thought I saw two heads!"  That explained his confused look.  He gave me a kiss, squeezed my hand, and the tech turned the monitor so I could see that sure enough there were two little babies inside my tummy.  I laughed, I cried, I asked, "Really?" like a thousand times...that seems to be my word for this pregnancy.
   During the ultrasound we found out that we were having 2 little boys.  Now we'll be parents of what most people keep calling, the "perfect" scenario.  Two girls and two boys.  We are over the shock period now and are just elated.  Not niave though, we're semi-aware of how much work it's going to be but are still looking forward to the arrival of our boys.
 Telling our family was the really fun part...

Tuesday, November 13, 2012

Twin Tuesday

  A little change of pace from my normal (infrequent) posts....I thought I'd write a little about having twins.   I'm surprised that there isn't a ton of information about having twins out there, because it's more common now to have twins than ever before.
  Here's some fun things to know about twins:

-About one in 30 births are twin births...
-From 1980 to 2009 the rate of twin births increased by 76%
-The increase may be due to the increase use of fertility drugs, the age of women having children being older (in their 30's rather than 20's), and other unknown attributes...I have my own theory here.
-Fraternal twins, NOT identical twins,  are genetic
-Twins are a genetic characteristic passed on only by the mother's side...(Sorry, Dad's don't get the credit for having twins)
-Identical twins are formed from one egg that splits...Fraternal twins come from two eggs that are fertilized at the same time.
-The term twin derives from a German word twin or twine which means "two together"
-The average time between delivery of the first twin and the second twin is 17 minutes
-Most twins are born between 28-35 weeks (average singleton is born at 37 weeks)
-William Shakespeare fathered twins, a boy and a girl...

Just some fun food for thought about twins...

Here's some fun articles to read...
TWINS™ Magazine Multiples Facts & Statistics
Twin Births in  the U.S., Like Never Before
 Trouble Doubled Blog

Sunday, October 28, 2012

Project Marathon: Christmas Tree Skirt Tutorial

 
Step 1:  Pick out your fabric and plan a pattern for your skirt.  I did a pattern that included 7 in squares of 6 different types of Christmas Fabric, Burlap, and Felt.  See below pictures for layout.  I cut and used 88 squares for my tree skirt.  I sewed 6 rows of 10, 2 rows of 8, and 2 rows of 6.  Then sewed the rows together.  Easy Breezy.
 
See my layout?...Love it!  Used the fabric from our stockings.
 
 
Step 2: Cut a circle for the bottom fabric.  I used an old tree skirt my mom made as a pattern.  It's not perfect but it worked.

Step 3(below): Lay your top and bottom pieces together (right sides together, wrong sides out).  Pin the two in place so that you are ready to sew them together.  Make a 1/2'' seem around the circle.  Then cut off the excess fabric.


Step 4:  Fold the tree skirt into fourths, so that you have a straight line to mark on one of the edges.  (This would be like drawing the radius on your skirt from the center to the edge of the circle). Mark the bottom (keep in mind this is the inside of your skirt and the markings won't show after you turn it right side out) of the tree skirt.


 Step 5: Unfold your skirt and mark a circle in the center of your skirt. (This is where the tree trunk will be).  I used a bowl for my circle.


 Step 6:  Sewing.  You will be sewing from the circle's edge to the small circle you drew in the center of the skirt along the radius line you first drew.  (Does that make sense?)  Do not sew on the line but 1/2'' to the left or right of the line.  See picture below.  Hope that helps...
 Continue sewing 1/2'' outside the radius line and around the small center circle's line.
 Continue sewing back down the other side of the radius line until you get to about 8' or more' from your outer seem.  This will be the hole that you will use to turn your tree skirt right side out. (Not sure if you can see that in the pictures below...tried to zoom in but my flash is awful).


 Step 7: Starting from the edge of your tree skirt, cut along your radius line and around your center circle line.  See below.

Step 8 (Finale!): Turn your tree skirt right side out.  Sew up the hole.


And you are done!  Ready for Christmas yet? 
Note: I personally will be adding some type of lace or frill to the edge of my skirt.  This may happen later...


Monday, September 24, 2012

Project Marathon-Look for Upcoming Posts!

Sadly, I've neglected my blog lately...but with good reasons.  Being pregnant with twins, my doctor recommended that I finish all big projects before 28 weeks!  Deadline: tomorrow!  Yikes!  Here's the projects I'll be posting once I've finished them up:

1.) Big Girl's Quilt
2.) Aprons
3.) Christmas tree skirt
4.) Big Sister Bag
5.) Little Burp Rags and Matching Monogram Blankets
6.) Stick Horses
7.) Crib Bumpers
8.) Little Twin Boys' Nursery Pictures

Plus, MORE FREEZER MEALS!!!!

So, keep checking back!  I'll be blogging more after these projects are finished!  The trick is to get them done secretly when my 3 year old isn't peeking since most of these projects are birthday and Christmas presents for the family.

Friday, September 7, 2012

Burlap Monogram Christmas Stockings DIY


Since we are expecting our twin boys at Christmas time, I figured I should probably make them stockings for Santa to bring them some fun goodies on Christmas Eve.  I made the rest of our stockings last year and luckily thought ahead enough to purchase fabric for new additions later.  I loved the way they turned out and hope you do too.  What I love best is that the burlap is forgiving.  If you don't cut it just perfect, it moves and stretches.  And felt is great because you don't have to worry about it's hem too much.

First Step:
Purchase your material.  Figure out how big you want your stockings and multiply that by how many you're going to be making.  Don't forget there's a front and a back side to your stocking.  I bought/ gathered:
-3 yards of Red felt (I wanted to make sure I had enough for a tree skirt later...just started working on that...keep you posted).
-3 yards of burlap (this left me some extra too)
-1 yard of Christmas material ( you could buy 1 yard each of different Christmas material if you want to make a matching tree skirt too or you could just get one yard total and mismatch or whatever)
-a spool of rick rack (ribbon for hanging the stockings)
-Red thread
-buttons
-a good pair of scissors
-tacky craft glue
-a needle

Second Step:
Cut your red felt the size you want your stockings (I used an old Christmas stocking as a pattern).  Cut a front and a back (it's best to fold your felt in half and just cut the front and back together).

Now cut your burlap stockings (front and back-fold your material in half) about 1/4" larger.  Your felt stockings are the lining and the burlap is the outside stocking (yes, this is a two layer stocking...burlap is itchy and it gives, wouldn't last long as a Christmas stocking on it's own...so, I made a felt lining).  Tip:  a good way to cut burlap straight is to pull one of the threads tight and then cut along the thread (it makes the line or thread more visible).

Once you've cut your lining stockings and your burlap stockings, cut a 3" x 3" square of felt.  This will be your piece that you sew buttons on for the monogram.  

Cut any decorations you'd like out of felt for the top front of the stocking.  I did a heart, tree, star, mittens, holly berry leaves, and a square present then embellished them with buttons and other trimmings.

Lastly, cut about 4-6" x the width of your stocking of your Christmas material.  My stockings were about 8 inches across so I cut my Christmas material at about 6" x 8 1/4". 

Third Step:  Monogram squares
Play with some buttons until you get your letters looking the way you want them to on your red felt square.  Once you have them in place, use tacky glue to attach them to the felt.  After a few minutes they should be dry enough for you to sew them on with needle and thread.


Fourth Step: Sewing
Now it's time to sew your red felt stockings front to back.  You won't have to flip the stocking inside out, I left mine just the way I cut them with a small hem.  Remember not to sew the opening shut.

Sew the top hem of the back piece of burlap.  The hem will be hidden inside your stocking once you sew the back to the front so don't worry about trimming it up.
(I tried to upload a picture of this but no luck, here's the next best thing)
(note the back-the burlap on the left in the picture- that's what I meant by making a hem)

Fifth Step: Pinning
Take your Christmas fabric and fold it over in half hot dog style, then fold where you would do a seam over (I was lazy and didn't hem my Christmas fabric because it will be hidden).  Tuck it on to the top of your front burlap stocking and fold over a piece of burlap about 1/2" in size.  (I know this sounds confusing, just look at the picture it's worth a million words).  Pin your burlap and Christmas fabric in place.

Now, pin your monogram square and embellishment (your tree, star, gift, snowflake, holly berrys or whatever you are clever enough to come up with) in place.
Ready for the next step?

Sixth Step: Sewing the burlap

Start by sewing your monogram square to the burlap.
 
Next sew on your embellishments to the front of the stocking.
Hand stitch any buttons or ribbon onto the embellishment.  (IN the picture you see a square, after I sewed it on I made a bow out of rick rack and sewed that to the top of the square with a button to make a present)

That's it for the front for now....

More pinning, then more sewing...almost done though, wooohoooo!  Pin the front of your stocking to the back of your stocking wrong sides out.
 
Now, you can sew your burlap stocking sides together, I left about a 1/4" hem.

Seventh step: Finishing touches
Sew on about 2 inches or so of rick rack or ribbon to the  side hem of the burlap stocking. (see below)  I made several passes with the machine to ensure that the ribbon would hold up our stockings.

 
Now it's time to flip your burlap stocking right side out.  Then tuck the red felt lining inside the burlap stocking.(Not a very good description or picture...hopefully, you get the idea though).
 
Congratulations!  You are done!  Now you just have to do that a few more times to make one for each member of your family...  good luck!  Let me know if you have questions!


Thursday, August 30, 2012

Party Friday

Joined two parties this week:
Little Becky Homecky  (note to self:  don't put my name for the name of the project!  LOL.  Anyone else do that before?)
One Artsy Mama

Check 'em out.

Tuesday, August 28, 2012

Shrinky Dink Pin is a Win!

I don't know about you but I totally remember making shrinky dinks when I was a kid.  Today we tried out a free and easy way to do it at home using this pin.

Here's ours, we only had one permanent marker color otherwise we would have made much cooler ones today:

At Home Preschool Prep Step 2

Here are a few other things I do with my kiddos to make learning more hands on and like "big kid's school".  I made a calendar last year that we used for preschool and I use it with my two girls almost every morning.  I bought a large poster, a calendar, numbers, and months of the year from the dollar tree.  Typed up a few things and taped it all together.  Then I went to Ofice Max and got it lamenated (they have teacher discounts...even if you're just a mama teaching your kiddos at home).  Our calendar includes the weather and seasons.  It also has another side where we write or post the letter, number, shape and/or color of the week.  Since it's lamenated I can use dry erase crayons or markers on it.  Here's the pictures of it:


I also got some letters at the dollar tree that we taped around the girls' room (for now) to make a word wall from all the site words we'll be learning this year.


Here are some book resources that I recommend for home schooling preschool aged kiddos (just click on the link to see the items on amazon.com) :
The Encyclopedia of Infant and Toddler Activities: Written by Teachers for Teachers

THE MAILBOX BOOKS DAY - BY - DAY PRESCHOOL PLANS

Almost Ready to Read (PreK-K)

Getting Ready to Read

 And of course there's all those wonderful ideas on pinterest and blogs out there that have amazing mom's doing awesome stuff with their kiddos!  I've pinned a few of them if you want to check out what I've pinned.


30 Sucks Pin is a Keeper

My awesome sister turned 30 today and we celebrated on Saturday by watching her swim sharks.  She's crazy...and super cool, right?  That was one of her life goals that she can now check off.  I wanted to get her a gag gift since we used to think 30 was so old (when your 8 and 10, 30 does seem kind of up there...not so much any more).  So, I saw on pinterest a cute idea and did it.  Here's how it turned out:


Monday, August 27, 2012

At Home Preschool Prep

Last year I did a co-op preschool with some wonderful ladies and it was a huge hit.  Now, being pregnant with twins I just can't do a large group this year.  Instead, I'm just going to do what I can with my kiddos.  I'm going to share with you what I do.   So, if you'd like to compliment me by copying me, you can.  The activities listed will be appropriate for preschool aged kiddos.  Mine are 18 months and 3 years old.

At the beginning of each school year in my classroom we always assessed what our students already knew.  So, I did that with my two girls.  Here's what I did based off of my state's preschool standards. You can find out what your state's standards are by looking online if you're curious what preschools should be teaching your kiddos.

18 Month Old Assessment:
At 18 Months children can range in their skills depending on what you've been working with them on.  We read, color, and sing daily.  We also have been working on colors and recognizing print in our environment.

Here are a few things to look at:
Can my child hold a book upright? 
Do they know the front from the back?
 Can they turn the pages sequentially? 
Do they recognize print/letters in their environment?  (My little one will point to words and say, "E E E" showing that she recognizes that letters symbolize sounds of words...very very basic)
Can they hold a crayon/pencil in a proper writing position?
Do they know their colors?  ( I have color flash cards.  I laid 2 or 3 out at a time and asked my 18 month old to find one of the colors.  She would point to the correct/ incorrect color.  I would note what colors she knew.  Then I'd ask her to say the color and write down if she could.  Part of her preschool at home will just be acquiring vocabulary).
Does your child copy cat letter sounds and names when you say them?
Does your child sing songs that they know? (They may not know all the words but do they do the actions with you?  Do they attempt to sing?)


3 Year Old Assessment:
Three year olds can vary in skills as well. My three year old has been worked with a lot and has done a whole year of co-op preschool.  We haven't worked on site words yet, but she is ready.  Here's what I looked at:

Can my child name all capital letters?  (not the sounds....that's another test.  A good way to do this assessment is to print of a page with all CAPITAL letters -not in alphabetical order and ask her to name a letter that you point to)
Can my child name all the lower case letters?
Does my child know the sounds each letter makes?  (There's many ways you can test this.  I have a visual and kinesthetic learner, so I had her point to a page of letters and say what the letter says.)
Does my daughter know the letters in her own name?  Can she write them?
Can my daughter recognize rhyming words?
Can my child recognize beginning sounds of words?
Does my child recognize words in books?  (My daughter is not reading yet, but she does recognize that I'm reading what the word on the page says.  I point to the words as I read so she recognizes that I read left to right, top to bottom.  She pretends to read this same way)
Does my child ask questions while reading a book that relates to the story? 
Can they predict what's going to happen using pictures and/or parts of the story to help?

Does my child know their colors?  shapes?
How high can my child count? (My 3 year old counts up to 13 without missing a number)
Does my child count items using one-to-one corespondence?  (Meaning when I place items in front of her...I placed 15 items out...can she point to one item at a time and assign just one number to them? Or does your child count without necessarily counting how many objects are out in front of them?  Does that make sense?)
Can my child identify big from small?  biggest?  smallest? shortest? tallest?  longest? same?  different?  (I used math worksheets with pictures on them that helped me assess each one of these concepts.)

 Again, this is informal assessments that I'm doing with my kiddos.  I just wanted a basic idea of what they know, so I can gear preschool towards what they need to work on.  Feel free to add to my list of questions based on what your kiddo may or may not know.  I focused mainly on math, reading, and writing.  There are other subjects in our state's standards that I did not assess.  Mostly because they will be incorporated into our daily lives and preschool lessons already and are skills I know they will acquire before kindegarten. Feel free to ask me questions or give suggestions too.  I'm not a pro at this but, I do love to teach and can find resources to help teach kiddos along the way.  And I'm all about collaborating to make learning more fun!

Saturday, August 25, 2012

First Blog Party-Shine on Fridays

As suggested by my good friend Jessica from Sewing Our Life Together (great blog!   Tons of sewing projeccts, gluten-free recipes, and wonderful stories!) I entered my first blog party.  Still not sure exactly how it works but one of the requirements was to grab a pin from the hosts blog and post it on my own...So here's who's hosting the one I joined last night:
Happy-Go-Lucky and One Artsy Mama. 

It's kind of cool to see how many bloggers are out there and everything they are putting up on their blogs!  The possibilities are endless!

Thursday, August 23, 2012

Crock Pot Freezer Meals-Chicken Part 1

I have no idea what to expect when our twins arrive, but I am anticipating being very busy with having 4 kids ages 3 and under.  So, I've adopted the motto, "Be prepared".  My plan of attack is this: FREEZER MEALS!  I figured it'd be a lot easier to prepare them in bulk and by category.  I'm going to show you what recipes I used so far and where I got them from (let's give credit where credit is due).  I'll also review the recipes as we eat them.

 Chicken Crock Pot Freezer Meals 1


Healthy Mama BBQ Chicken (courtesy of Mama and Baby Love)
Review: Hmmm...family was not a fan of this one.  Tasted a bit more like vegetable soup.  May be altering it a bit for next time.

Chicken Curry (courtesy of Mama and Baby Love again)
Review of Chicken Curry: Yum!  I loved the Mangoes in the curry as well as the sweet potatoes!

Teriyaki Chicken (courtesy of Ring Around the Rosies)
Review:  Not bad.  A little too much pineapple this go around. 

Slow-Cooked (Chicken) Fajitas -could use beef too (courtesy of Ring Around the Rosies)
Review:  Excellent!  This one was a win!

Cilantro Lime Chicken with black beans and corn (Ring Around the Rosies)

Divine Chicken (Ring Around the Rosies) (for these last two recipes, make sure you click on the printer friendly recipes link she has at the top of her page)
Review:  This was easy and yummy.  Perfect for a winter day!

Prep Time: Altogether this go around of chicken crockpot freezer meals took me about 5 hours to prepare and clean up after ( keep in mind I have 2 kiddos who love mom to entertain them and I'm extra slow because of my big belly).

Cost:  I figured that the total costs ( not including: milk, brown sugar, spices, flour and chicken bouillon cubes because I have those on hand regularly)= $50.79.  I really got 13 meals from this (12 in the freezer and one in our tummies from tonight) so the average per freezer meal was= $3.90.  These meals feed our family- 2 adults and 2 kiddos (3yrs and 18 months)- and gives at least one to two extra adult lunch meals. So really you're talking about 2 weeks worth of dinners (one night of left overs?) and at least 12-26 adult lunch meals.  Not too bad for $50 and healthy, quick, and convenient meals!  Am I throwing in too much math here?  Sorry, the geeky teacher side of me got out again.

Tuesday, August 21, 2012

Felt Doll Quiet Books

I made these books for a LOOOOOOOOONG car ride to entertain my girls.  I had lots of felt and fabric downstairs, so I thought what the heck and got the creativity going.  Sorry there's no tutorial, I made these before I entered blogland.
I made the outside look like little suitcases with handles and buttons to help keep the books closed.

 To make things interesting I made a boy book and a girl book.  I handstitched their faces and used a sewing machine for the rest.  Each book has two pockets on the left to hold shirts and accessories and bottoms.


Here's the girl wardrobe.  Mostly princess attire and church clothes.  I figured the boy could share his clothes since the body patterns are the same.


The boy wardrobe was WAY TOO MUCH FUN!  I made a church outfit, an every day outfit, a pirate outfit, a football uniform, and a farmers outfit.  Ironically, my little 3 year old loves the boy book better.  She loves the pirate outfit the best.  I do too.


I kept the body pattern that I used for the books so that way I could make more outfits later.  I still have to make some shoes, bags, scriptures, sword, and football...the posibilities are endless.  And it really is too much fun!

Picture to Canvas on Pinterest is a Keeper

I wanted to put a picture of the temple where my husband and I were married onto a canvas for our anniversary using a tutorial from Girl. Inspired. And it totally worked!!!!  Keywords: Mod Podge! I loved the results:

I also got the temple picture from pinterest.  Although, I tried going back to the website today and it didn't work.  Maybe another day?  Until then, you can check it out on my pins.

I added For time and Eternity, Est. 2006 on the bottom using Before the Rain font that I found from a blog called Going Home to Roost.  You can find it here.  There's tons of free fonts listed on her website that are super duper cute!

I made another canvas for my sister using the Denver Temple.  It turned out pretty good too.

Our Little Girl's Rooms

I'm starting to collect ideas for my twin boys' nursery and I love when other people post what they've done online.  So, I'm going to share what I've done in our house for our girls.  Kind of like an idea swap.  That's the real reason why I'm blogging.  I'm always checking out the ideas brilliant people are posting online and using them.  So in a way, I figured blogging my okay or so-so ideas could be like paying it forward. 
  Here's what we've done for our girls' rooms:

Nursery:  We painted 3 walls 'Sweet Baby Girl Pink' and on the fourth wall we painted verticle stripes with 'Sweet Baby Girl Pink' and 'Bubble Gum Pink' (both paint colors from Home Depot.  Then we hung a green wreath that I made from a strand of garland from Hobby Lobby and two mobiles that I made from wire and extra leaves from the same garland.  Kind of gives the room a sweet garden theme.  That was my thought for it anyway. 
Embellishments: On two opposite walls I hung two more strands of garland, a quilt, two canvases I painted, and a chalkboard/corkboard I painted and decorated.  See pictures below:


Toddler Room:  We had a lot of fun with this room!  Getting a little more courage with paint, I decided to add a bright green (can't recollect the color name right now) and a mural of a tree in the corner.  I wanted a whimsical tree so I used white paint for the bark and made the leaves three different colors that coordinated with the room.  I used my cricut to make the flower template that you see all around the border and I traced the edge of a big old bowl to make the wavy border of green and pink paint.  It was a lot of work but lots of fun.  Tip: When painting a mural or other artwork, it's handy to write or trace them on the wall first using chalk instead of a pencil.  The chalk wipes right off after painting, instead of having to erase or paint over pencil marks later.
Embellishments: a mirror I decorated for my girls and handy string of ribbon with clothespins to display artwork.  See pictures below:


 Details of tree with white, pink and green leaves.  I bought two butterflies clips at Michael's and attached them the wall using thumb tacks then just clipping the butterflies to the tacks.  Easy peasy.


Black out drapes I made to help darken my girl's room for naps.  Super cute and easy.

Here's the artwork displayed on the ribbon.  Beautiful artwork!

And the mirror...needs to be cleaned apparently.  So, hopefully, this gives someone out there ideas for their daughter's nursery.  If not, oh well, I love what we've done with the place.  And thank you all for posting such great ideas on your blogs and online to give me inspiration!!!!