Joined two parties this week:
Little Becky Homecky (note to self: don't put my name for the name of the project! LOL. Anyone else do that before?)
One Artsy Mama
Check 'em out.
Thursday, August 30, 2012
Tuesday, August 28, 2012
Shrinky Dink Pin is a Win!
I don't know about you but I totally remember making shrinky dinks when I was a kid. Today we tried out a free and easy way to do it at home using this pin.
Here's ours, we only had one permanent marker color otherwise we would have made much cooler ones today:


Here's ours, we only had one permanent marker color otherwise we would have made much cooler ones today:


At Home Preschool Prep Step 2
Here are a few other things I do with my kiddos to make learning more hands on and like "big kid's school". I made a calendar last year that we used for preschool and I use it with my two girls almost every morning. I bought a large poster, a calendar, numbers, and months of the year from the dollar tree. Typed up a few things and taped it all together. Then I went to Ofice Max and got it lamenated (they have teacher discounts...even if you're just a mama teaching your kiddos at home). Our calendar includes the weather and seasons. It also has another side where we write or post the letter, number, shape and/or color of the week. Since it's lamenated I can use dry erase crayons or markers on it. Here's the pictures of it:


I also got some letters at the dollar tree that we taped around the girls' room (for now) to make a word wall from all the site words we'll be learning this year.

Here are some book resources that I recommend for home schooling preschool aged kiddos (just click on the link to see the items on amazon.com) :
The Encyclopedia of Infant and Toddler Activities: Written by Teachers for Teachers
THE MAILBOX BOOKS DAY - BY - DAY PRESCHOOL PLANS
Almost Ready to Read (PreK-K)
Getting Ready to Read
And of course there's all those wonderful ideas on pinterest and blogs out there that have amazing mom's doing awesome stuff with their kiddos! I've pinned a few of them if you want to check out what I've pinned.
30 Sucks Pin is a Keeper
My awesome sister turned 30 today and we celebrated on Saturday by watching her swim sharks. She's crazy...and super cool, right? That was one of her life goals that she can now check off. I wanted to get her a gag gift since we used to think 30 was so old (when your 8 and 10, 30 does seem kind of up there...not so much any more). So, I saw on pinterest a cute idea and did it. Here's how it turned out:


Monday, August 27, 2012
At Home Preschool Prep
Last year I did a co-op preschool with some wonderful ladies and it was a huge hit. Now, being pregnant with twins I just can't do a large group this year. Instead, I'm just going to do what I can with my kiddos. I'm going to share with you what I do. So, if you'd like to compliment me by copying me, you can. The activities listed will be appropriate for preschool aged kiddos. Mine are 18 months and 3 years old.
At the beginning of each school year in my classroom we always assessed what our students already knew. So, I did that with my two girls. Here's what I did based off of my state's preschool standards. You can find out what your state's standards are by looking online if you're curious what preschools should be teaching your kiddos.
18 Month Old Assessment:
At 18 Months children can range in their skills depending on what you've been working with them on. We read, color, and sing daily. We also have been working on colors and recognizing print in our environment.
Here are a few things to look at:
Can my child hold a book upright?
Do they know the front from the back?
Can they turn the pages sequentially?
Do they recognize print/letters in their environment? (My little one will point to words and say, "E E E" showing that she recognizes that letters symbolize sounds of words...very very basic)
Can they hold a crayon/pencil in a proper writing position?
Do they know their colors? ( I have color flash cards. I laid 2 or 3 out at a time and asked my 18 month old to find one of the colors. She would point to the correct/ incorrect color. I would note what colors she knew. Then I'd ask her to say the color and write down if she could. Part of her preschool at home will just be acquiring vocabulary).
Does your child copy cat letter sounds and names when you say them?
Does your child sing songs that they know? (They may not know all the words but do they do the actions with you? Do they attempt to sing?)
3 Year Old Assessment:
Three year olds can vary in skills as well. My three year old has been worked with a lot and has done a whole year of co-op preschool. We haven't worked on site words yet, but she is ready. Here's what I looked at:
Can my child name all capital letters? (not the sounds....that's another test. A good way to do this assessment is to print of a page with all CAPITAL letters -not in alphabetical order and ask her to name a letter that you point to)
Can my child name all the lower case letters?
Does my child know the sounds each letter makes? (There's many ways you can test this. I have a visual and kinesthetic learner, so I had her point to a page of letters and say what the letter says.)
Does my daughter know the letters in her own name? Can she write them?
Can my daughter recognize rhyming words?
Can my child recognize beginning sounds of words?
Does my child recognize words in books? (My daughter is not reading yet, but she does recognize that I'm reading what the word on the page says. I point to the words as I read so she recognizes that I read left to right, top to bottom. She pretends to read this same way)
Does my child ask questions while reading a book that relates to the story?
Can they predict what's going to happen using pictures and/or parts of the story to help?
Does my child know their colors? shapes?
How high can my child count? (My 3 year old counts up to 13 without missing a number)
Does my child count items using one-to-one corespondence? (Meaning when I place items in front of her...I placed 15 items out...can she point to one item at a time and assign just one number to them? Or does your child count without necessarily counting how many objects are out in front of them? Does that make sense?)
Can my child identify big from small? biggest? smallest? shortest? tallest? longest? same? different? (I used math worksheets with pictures on them that helped me assess each one of these concepts.)
Again, this is informal assessments that I'm doing with my kiddos. I just wanted a basic idea of what they know, so I can gear preschool towards what they need to work on. Feel free to add to my list of questions based on what your kiddo may or may not know. I focused mainly on math, reading, and writing. There are other subjects in our state's standards that I did not assess. Mostly because they will be incorporated into our daily lives and preschool lessons already and are skills I know they will acquire before kindegarten. Feel free to ask me questions or give suggestions too. I'm not a pro at this but, I do love to teach and can find resources to help teach kiddos along the way. And I'm all about collaborating to make learning more fun!
Saturday, August 25, 2012
First Blog Party-Shine on Fridays
As suggested by my good friend Jessica from Sewing Our Life Together (great blog! Tons of sewing projeccts, gluten-free recipes, and wonderful stories!) I entered my first blog party. Still not sure exactly how it works but one of the requirements was to grab a pin from the hosts blog and post it on my own...So here's who's hosting the one I joined last night:
Happy-Go-Lucky and One Artsy Mama.
It's kind of cool to see how many bloggers are out there and everything they are putting up on their blogs! The possibilities are endless!
Happy-Go-Lucky and One Artsy Mama.
It's kind of cool to see how many bloggers are out there and everything they are putting up on their blogs! The possibilities are endless!
Thursday, August 23, 2012
Crock Pot Freezer Meals-Chicken Part 1
I have no idea what to expect when our twins arrive, but I am anticipating being very busy with having 4 kids ages 3 and under. So, I've adopted the motto, "Be prepared". My plan of attack is this: FREEZER MEALS! I figured it'd be a lot easier to prepare them in bulk and by category. I'm going to show you what recipes I used so far and where I got them from (let's give credit where credit is due). I'll also review the recipes as we eat them.
Healthy Mama BBQ Chicken (courtesy of Mama and Baby Love)
Review: Hmmm...family was not a fan of this one. Tasted a bit more like vegetable soup. May be altering it a bit for next time.
Chicken Curry (courtesy of Mama and Baby Love again)
Review of Chicken Curry: Yum! I loved the Mangoes in the curry as well as the sweet potatoes!
Teriyaki Chicken (courtesy of Ring Around the Rosies)
Review: Not bad. A little too much pineapple this go around.
Slow-Cooked (Chicken) Fajitas -could use beef too (courtesy of Ring Around the Rosies)
Review: Excellent! This one was a win!
Cilantro Lime Chicken with black beans and corn (Ring Around the Rosies)
Divine Chicken (Ring Around the Rosies) (for these last two recipes, make sure you click on the printer friendly recipes link she has at the top of her page)
Review: This was easy and yummy. Perfect for a winter day!
Prep Time: Altogether this go around of chicken crockpot freezer meals took me about 5 hours to prepare and clean up after ( keep in mind I have 2 kiddos who love mom to entertain them and I'm extra slow because of my big belly).
Cost: I figured that the total costs ( not including: milk, brown sugar, spices, flour and chicken bouillon cubes because I have those on hand regularly)= $50.79. I really got 13 meals from this (12 in the freezer and one in our tummies from tonight) so the average per freezer meal was= $3.90. These meals feed our family- 2 adults and 2 kiddos (3yrs and 18 months)- and gives at least one to two extra adult lunch meals. So really you're talking about 2 weeks worth of dinners (one night of left overs?) and at least 12-26 adult lunch meals. Not too bad for $50 and healthy, quick, and convenient meals! Am I throwing in too much math here? Sorry, the geeky teacher side of me got out again.
Chicken Crock Pot Freezer Meals 1
Healthy Mama BBQ Chicken (courtesy of Mama and Baby Love)
Review: Hmmm...family was not a fan of this one. Tasted a bit more like vegetable soup. May be altering it a bit for next time.
Chicken Curry (courtesy of Mama and Baby Love again)
Review of Chicken Curry: Yum! I loved the Mangoes in the curry as well as the sweet potatoes!
Teriyaki Chicken (courtesy of Ring Around the Rosies)
Review: Not bad. A little too much pineapple this go around.
Slow-Cooked (Chicken) Fajitas -could use beef too (courtesy of Ring Around the Rosies)
Review: Excellent! This one was a win!
Cilantro Lime Chicken with black beans and corn (Ring Around the Rosies)
Divine Chicken (Ring Around the Rosies) (for these last two recipes, make sure you click on the printer friendly recipes link she has at the top of her page)
Review: This was easy and yummy. Perfect for a winter day!
Prep Time: Altogether this go around of chicken crockpot freezer meals took me about 5 hours to prepare and clean up after ( keep in mind I have 2 kiddos who love mom to entertain them and I'm extra slow because of my big belly).
Cost: I figured that the total costs ( not including: milk, brown sugar, spices, flour and chicken bouillon cubes because I have those on hand regularly)= $50.79. I really got 13 meals from this (12 in the freezer and one in our tummies from tonight) so the average per freezer meal was= $3.90. These meals feed our family- 2 adults and 2 kiddos (3yrs and 18 months)- and gives at least one to two extra adult lunch meals. So really you're talking about 2 weeks worth of dinners (one night of left overs?) and at least 12-26 adult lunch meals. Not too bad for $50 and healthy, quick, and convenient meals! Am I throwing in too much math here? Sorry, the geeky teacher side of me got out again.
Tuesday, August 21, 2012
Felt Doll Quiet Books
I made these books for a LOOOOOOOOONG car ride to entertain my girls. I had lots of felt and fabric downstairs, so I thought what the heck and got the creativity going. Sorry there's no tutorial, I made these before I entered blogland.

 To make things interesting I made a boy book and a girl book. I handstitched their faces and used a sewing machine for the rest. Each book has two pockets on the left to hold shirts and accessories and bottoms.

Here's the girl wardrobe. Mostly princess attire and church clothes. I figured the boy could share his clothes since the body patterns are the same.

The boy wardrobe was WAY TOO MUCH FUN! I made a church outfit, an every day outfit, a pirate outfit, a football uniform, and a farmers outfit. Ironically, my little 3 year old loves the boy book better. She loves the pirate outfit the best. I do too.
I kept the body pattern that I used for the books so that way I could make more outfits later. I still have to make some shoes, bags, scriptures, sword, and football...the posibilities are endless. And it really is too much fun!

I made the outside look like little suitcases with handles and buttons to help keep the books closed.


Here's the girl wardrobe. Mostly princess attire and church clothes. I figured the boy could share his clothes since the body patterns are the same.

The boy wardrobe was WAY TOO MUCH FUN! I made a church outfit, an every day outfit, a pirate outfit, a football uniform, and a farmers outfit. Ironically, my little 3 year old loves the boy book better. She loves the pirate outfit the best. I do too.
I kept the body pattern that I used for the books so that way I could make more outfits later. I still have to make some shoes, bags, scriptures, sword, and football...the posibilities are endless. And it really is too much fun!
Picture to Canvas on Pinterest is a Keeper
I wanted to put a picture of the temple where my husband and I were married onto a canvas for our anniversary using a tutorial from Girl. Inspired. And it totally worked!!!! Keywords: Mod Podge! I loved the results:


I also got the temple picture from pinterest. Although, I tried going back to the website today and it didn't work. Maybe another day? Until then, you can check it out on my pins.
I added For time and Eternity, Est. 2006 on the bottom using Before the Rain font that I found from a blog called Going Home to Roost. You can find it here. There's tons of free fonts listed on her website that are super duper cute!
I made another canvas for my sister using the Denver Temple. It turned out pretty good too.
Our Little Girl's Rooms
I'm starting to collect ideas for my twin boys' nursery and I love when other people post what they've done online. So, I'm going to share what I've done in our house for our girls. Kind of like an idea swap. That's the real reason why I'm blogging. I'm always checking out the ideas brilliant people are posting online and using them. So in a way, I figured blogging my okay or so-so ideas could be like paying it forward.
Here's what we've done for our girls' rooms:
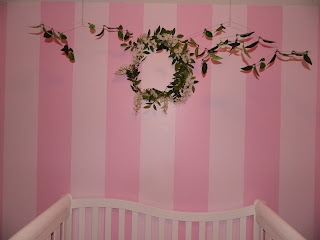
Nursery: We painted 3 walls 'Sweet Baby Girl Pink' and on the fourth wall we painted verticle stripes with 'Sweet Baby Girl Pink' and 'Bubble Gum Pink' (both paint colors from Home Depot. Then we hung a green wreath that I made from a strand of garland from Hobby Lobby and two mobiles that I made from wire and extra leaves from the same garland. Kind of gives the room a sweet garden theme. That was my thought for it anyway.
Embellishments: On two opposite walls I hung two more strands of garland, a quilt, two canvases I painted, and a chalkboard/corkboard I painted and decorated. See pictures below:


Toddler Room: We had a lot of fun with this room! Getting a little more courage with paint, I decided to add a bright green (can't recollect the color name right now) and a mural of a tree in the corner. I wanted a whimsical tree so I used white paint for the bark and made the leaves three different colors that coordinated with the room. I used my cricut to make the flower template that you see all around the border and I traced the edge of a big old bowl to make the wavy border of green and pink paint. It was a lot of work but lots of fun. Tip: When painting a mural or other artwork, it's handy to write or trace them on the wall first using chalk instead of a pencil. The chalk wipes right off after painting, instead of having to erase or paint over pencil marks later.
Embellishments: a mirror I decorated for my girls and handy string of ribbon with clothespins to display artwork. See pictures below:

 Details of tree with white, pink and green leaves. I bought two butterflies clips at Michael's and attached them the wall using thumb tacks then just clipping the butterflies to the tacks. Easy peasy.


Black out drapes I made to help darken my girl's room for naps. Super cute and easy.

 Here's the artwork displayed on the ribbon. Beautiful artwork!

And the mirror...needs to be cleaned apparently. So, hopefully, this gives someone out there ideas for their daughter's nursery. If not, oh well, I love what we've done with the place. And thank you all for posting such great ideas on your blogs and online to give me inspiration!!!!
Here's what we've done for our girls' rooms:
Nursery: We painted 3 walls 'Sweet Baby Girl Pink' and on the fourth wall we painted verticle stripes with 'Sweet Baby Girl Pink' and 'Bubble Gum Pink' (both paint colors from Home Depot. Then we hung a green wreath that I made from a strand of garland from Hobby Lobby and two mobiles that I made from wire and extra leaves from the same garland. Kind of gives the room a sweet garden theme. That was my thought for it anyway.
Embellishments: On two opposite walls I hung two more strands of garland, a quilt, two canvases I painted, and a chalkboard/corkboard I painted and decorated. See pictures below:


Toddler Room: We had a lot of fun with this room! Getting a little more courage with paint, I decided to add a bright green (can't recollect the color name right now) and a mural of a tree in the corner. I wanted a whimsical tree so I used white paint for the bark and made the leaves three different colors that coordinated with the room. I used my cricut to make the flower template that you see all around the border and I traced the edge of a big old bowl to make the wavy border of green and pink paint. It was a lot of work but lots of fun. Tip: When painting a mural or other artwork, it's handy to write or trace them on the wall first using chalk instead of a pencil. The chalk wipes right off after painting, instead of having to erase or paint over pencil marks later.
Embellishments: a mirror I decorated for my girls and handy string of ribbon with clothespins to display artwork. See pictures below:


Black out drapes I made to help darken my girl's room for naps. Super cute and easy.


And the mirror...needs to be cleaned apparently. So, hopefully, this gives someone out there ideas for their daughter's nursery. If not, oh well, I love what we've done with the place. And thank you all for posting such great ideas on your blogs and online to give me inspiration!!!!
Tutu tutorial from Pinterest is a Keeper
So, I have a confession to make. I am addicted to pinterest! Who isn't though, right? I figured I'd better start going through all the pins I've pinned to see what's worth saving. One I tried and loved (because it was sooooo easy and made my girls super excited), was a tutu tutorial from: Simply Real Moms . Took me only 30 minutes to make two tutus. Here's mine (er, I mean my girls' tutus):
 I bought the tulle by the yard, but she said in her post that they sell tulle on a spool...would be even faster to make if you bought it that way! Check it out!

Monday, August 20, 2012
The 2-hour Long Skirt
The 2-hour Long Skirt

Being my very first post, I hope you all forgive me if this is unclear. I wanted to show off my new long yellow skirt that I made in just two hours this last weekend. Being very pregnant with twins and only 22 weeks along, I realized, "hmmm, most of my clothes are going to be shrinking...better buy bigger, non-shrinkable clothes". Okay, okay, I know my clothes aren't getting smaller, but a girl can blame it on her clothes instead of her waistline, right? Especially, when she's pregnant... with Twins!! That's my excuse for everything.
Okay, so now that you've all seen my skirt...now for the tell part. I made my skirt longer to hide my beautiful varicose veins, but I think a shorter skirt made this way would be SUPER cute. Maybe after pregnancy I'll make a shorter version and get those veins removed and show my legs in public again...we shall see.
How to make the 2-hour Long Skirt (or short skirt...your choice)
Step 1: Buy 2 yards of cute fabric (mine cost me $5 at Jo-Anns) and 1/2 yard (or more, if you are making more clothes with a stretchy band top) of 4-way stretch fabric. The type of stretch fabric I bought was at Jo-Anns and was next to the Jersey Knit fabric in the Performance/Dance fabric section. It cost $16.99 a yard, but I did have a 40% off coupon...big save. It's nice and thin but will last lots of wear. Not that I'll be doing any performances or dancing in this skirt, but what works, works...right?
Step 2: Cut your belly band out of that wonderful stretchy fabric. I made mine wide enough to go around just below my belly bump (so where my hips should be) and gave it a little extra for seams and growing room. I made it 10 inches wide so when it's folded over it's around 5 inches (this will be the very top of your skirt).

Next, cut your cotton skirt fabric the length you want your skirt, plus an extra inch or so for a bottom seam. I made mine longer, but it's up to you. My fabric was 43" wide, so I just cut a little off of that for the length. I left my width at 2 yards so when I sew it it will gather and give me a little volume to my skirt.

Here's the two cut pieces together, shown folded how they'll be sewn.

Step 3: Now for the sewing part. I'm not a professional seamstress, nor have I made anything for me to wear since high school...but, here's what I did: Sew the skirt's bottom hem. I folded the bottom over about an inch or so and just did a plain old straight stitch.

Step 4: Now sew the side seam of the skirt. I used a straight stitch.


Subscribe to:
Posts (Atom)